Thursday, December 23, 2010

Pumpkin Cutlets & Solstice Dinner

At the end of last week, I revisited my squash nuggets recipe -- this time, making cutlets instead of nuggets! I also didn't have any squash handy, so I used a 15 oz can of pureed pumpkin instead of the mashed squash. I used thyme, oregano, sage, marjoram, garlic powder, and a bit of salt to season them. They were superterrific this way! We ate them with brown gravy and cranberry relish, with some lovely green beans in a dijon vinaigrette made by our friend Jimmy on the side.


Then on Tuesday night, we had dinner with my dad and brother to celebrate winter solstice! This picture is a bit dark because we were dining by candlelight, but the meal was amazing. We had a celebration roast with a pomegranate glaze and extra pomegranate jelly on the side, some roasted root vegetables, a lovely salad with chunks of oranges and an orange vinaigrette, and rolls like my dad's grandmother used to make for the holidays. Delicious! The pomegranate glaze and jelly were made from squeezing the juice from pomegranate seeds, whisking that together with a bit of cornstarch and a bit of agave nectar, and then continuing to whisk as it heated and thickened! P did all the juice squeezing, so he really did all the hard work -- and the end result tasted amazing.


For dessert, there were chocolate covered pomegranate seeds, an eggnog cake, and plenty of soy eggnog. Zelda chowed down on the pomegranate jelly, the rolls, and some cake for dessert; based on her reactions, I'd say her first solstice was a success!

Saturday, December 4, 2010

Vegan Sufganiyot!

A little more appropriate for Hanukkah, tonight I made sufganiyot -- sponge-y doughnuts filled with jam and covered with powdered sugar. In fact, the word 'sufganiyot' comes from 'sfog,' the Hebrew word for sponge. Slightly healthier than the normal variety, these little guys were baked instead of fried.


They came out great! Perfect sponge-y texture, filled with a dollop of raspberry jam. Zelda is not to be trusted with sticky jam, but she chowed down on plain doughnuts -- while P and I ate the gussied up ones. I modified the recipe from here, but the most important modification was making doughnuts that were fillable instead of doughnuts that already have holes all the way through! I've made those doughnuts about a million times and they are awesome, so do yourself a favor and try them out!

Friday, December 3, 2010

Vegan Matzo Brie

Sure, it's the wrong holiday for matzo, but I haven't had matzo brie in forever -- and P has never had it! -- so I decided it was as good a time as any to whip some up.

with powdered sugar

There are lots of parameters for matzo brie: is it matzo or matzah? is it brie or brei? it is more like scrambled eggs or more like french toast or a fritatta? is it sweet or savory?

The variety I'm used to from my childhood is the sweet, french toast-like version -- and so that's what I made! Not the most photogenic, but totally delicious -- topped with maple syrup, jam, or powdered sugar. Even Zelda devoured the matzo brie!

with raspberry jam


Matzo Brie
  • 12 unsalted matzo (one box)
  • 1 box silken tofu (I used firm, but it doesn't really matter)
  • 1/2 c non-dairy milk of your choice (I used rice milk)
  • 1 tbsp cinnamon
  • 1 tsp vanilla
  • 1 1/2 tsp black salt
  • 1 tbsp maple syrup

Break the matzo into pieces that are about two inches on each side and run the pieces under cold water. Drain them in a colander, and set aside -- the matzo should soften up quite a bit.

Combine the rest of the ingredients in a food processor and blend until smooth.

Place the softened matzo in a large pan and cover thoroughly with the tofu mixture. The matzo should be totally coated in the tofu mixture throughout, so make sure it gets evenly distributed! A rubber spatula can help with the spreading.

Cook for about seven to ten minutes on one side, then flip the mixture over so it can brown a bit more on the other side -- about five more minutes. You may want to cut the matzo brie into a couple of big pieces to flip it more easily.

Serve with jam or maple syrup!

Sunday, November 28, 2010

Thanksgiving!

Thanksgiving is the big holiday in our family, so I spent most of the week getting ready for the big day. And here's what we had!


Yes, that is two kinds of stuffing on the plate there -- cornbread stuffing at the bottom and sausage stuffing at the top. All of the produce (yams, potatoes, chard, cranberries) came from the farmer's market. That delicious slab of protein in the middle there is Field Roast's hazelnut cranberry roast en croute.

Not pictured: pumpkin cheesecake, pumpkin pie, apple-cranberry pie, macademia creme, vanilla coconut milk ice cream. The apple-cranberry pie (made by my friend Sarah) was one of the very best apple pies I have ever eaten -- and certainly the best apple cranberry pie I'd ever had. Yum! In fact, the only apple pie to rival this one is the apple pie that my Aunt Karen (for whom the blog is named!) would make every year at Thanksgiving. If I can't have that one . . . well, this cranapple pie is a delightful substitute!

Saturday, November 20, 2010

Squash Nuggets

We went to a potluck last night and I've been feeling in the autumn spirit as I think about what to make for Thanksgiving next week, so I wanted to bring some very seasonal, autumn-y dishes. I decided to make pumpkin spice cupcakes with cinnamon creamcheese frosting, and these little guys -- squash nuggets.


I was thinking about the super-delicious zucchini cakes I made this summer and wanted to make something in that family, where the vegetable is transformed into the centerpiece of the meal instead of a side. The nuggets have a nice chewy texture from the vital wheat gluten, more like a meat analog than like a pure vegetable. We ate ours dipped in mustard, but they were also good plain.

Really any spice blend would work with these little guys! Next time, I will probably try cinnamon, curry powder, coriander, and ginger. Another blend that would work great with the squash is rosemary, thyme, basil, oregano, and garlic. This recipe is definitely open to lots of different flavorings, so you can get creative with the spices!

Squash Nuggets
makes two dozen nuggets or six cutlets
  • 1 1/2 c roasted squash, mashed (you can also use canned pumpkin)
  • 1 c vital wheat gluten
  • 1/2 c bread crumbs
  • 1/2 tsp thyme
  • 1/2 tsp sage
  • 1/2 tsp salt
  • 1/4 tsp garlic powder
  • 1/4 tsp marjoram
Combine ingredients in a bowl and knead until strings start to appear. Form the dough into small balls about 1 inch in diameter, then flatten them out into nugget shape and place nuggets on a lightly oiled baking sheet. Brush the tops of the nuggets with olive oil, and bake at 350 for 20 minutes -- flipping the nuggets halfway through.


I roasted three small winter squashes left from our CSA -- one delicata, one acorn, and one butternut -- but really any kind of winter squash (including pumpkin!) would work. To roast the squashes, I cut them in half and placed them on a lightly greased baking sheet, then threw them in the oven at 400° for about 45 minutes. If you don't want to roast them yourself, canned pumpkin or squash puree would definitely work in place of the roasted squash. My three squashes yielded a cup and a half of mashed squash, but if you end up with more or less squash after roasting, this recipe could be scaled up or down accordingly.

Roasting the squash takes the longest amount of time; the rest of the recipe comes together very quickly and easily. Since you don't actually have to be there watching the squash while it roasts (in fact, I left P with the roasting squash while Zelda & I went to the store to pick up some ingredients for the cupcakes!), it is not a very time-consuming recipe. Definitely easy enough -- and tasty enough! -- to be worth making again!

Update: These nuggets have become a family favorite!  You can either make a whole bunch of nuggets or make them into larger cutlets.  I normally make some big cutlets for the grown-ups and nuggets for Zelda.

Rice Noodles with Broccoli in Peanut Sauce, version 2.0

It's true that I've posted a similar dish in the past, but there have been some advancements made between the last time and Monday night, when we had this for dinner.

The first advancement is that I made my own peanut sauce this time, instead of copping out and using an already prepared variety. I found Thai culinary stock at Wegman's -- which was fabulous! --though any kind of vegetable broth would certainly have worked in its place. To make the sauce, I began by heating up some of the broth and then mixing in a couple of tablespoons of natural peanut butter so that it dissolved completely. I also added sriracha, lime juice, and a little bit of tapioca flour to thicken the sauce a tad more. I actually meant to add coconut milk, but completely forgot about it; the additional creaminess would be welcome in the future, but the sauce still managed to be quite tasty without it. Even though there wasn't much actual peanut butter in the sauce, it still had a nice, full peanuty flavor.

The second advancement is about the noodles themselves. Previously, I always would drop the noodles in boiling water for two or three minutes before using them; on Monday, I learned about a different technique! Instead of boiling, you can soak the rice noodles in cold water for about twenty minutes and (after draining them) they're all ready to use.


The noodles and peanut sauce, stir-fried with delicious broccoli from the farmers' market, are pictured above. Unfortunately, today was the last day of the farmers' market, so the broccoli we picked up this morning will probably be the last we have for awhile! In the past week, I've learned that there is one local farm market that will be open through the end of December -- so we'll be able to get winter squash, apple cider, and canned tomatoes there, though I'm not sure if they have anything else. It would be a very long winter on just squash and tomatoes! I would love to continue eating only locally-grown produce during the winter, but I'm sure we would get very sick of squash and tomatoes. I am still looking into the potential for growing some spinach inside, but I'm not sure how well that would work. More to come on this later!

Saturday, November 13, 2010

Garlicky Kale, White Beans, & Sausage

It's been awhile since I've posted anything, plus our CSA has been finished for several weeks now -- but I'm still here! Things have been crazy with school and the tiny one, but I'm going to try to get back into posting regularly.

We got a great haul at the farmers' market this week, but I am already beginning to worry about the weeks to come; next week is the final week of the season . . . where am I going to get produce then? Are there any farms around here that are open year round? Should I try to grow some indoor vegetables?

Those worries aside, let me tell you about tonight's dinner! I have to start with a confession. I decided what to make tonight because I've always thought the word 'garlicky' is one of the best words ever, and wanted an excuse to use it. That, and we got a gorgeous bunch of kale from the farmers' market this week!

Kale, white beans, and sausage is one of those meals I think of as very classic Italian, and I was all set to make my Italian friends proud (I'm looking at you, JerzeyGrrl!) by making the Italian sausages from Vegan Brunch and giving this meal the proper Italian treatment. But . . . well, I didn't have any tomato paste. Or fennel. Or oregano. Or, really, any of the appropriate seasonings to make some good Italian food. I know, I know.

So what did I have? My answer to everything: curry paste! Instead of tomato paste, I used curry paste; instead of Italian seasonings, I used Indian seasonings. I always have the goods to make Indian food, and so I turned this Italian classic into something new.

I used cannellini beans as the base for the sausages, since I was going to be using them for the rest of the meal anyway. The sausages turned out a little softer than usual, which I am going to attribute to the softness of the beans that I was using -- but they were super tasty! After steaming the sausages, I diced two of them up and sauteed them in a little olive oil before adding the kale.

The kale came with a whole boatload of garlic -- it was supposed to be garlicky, after all! -- and a bit more of the same Indian spices I'd used in the sausages. Once the kale started wilting appropriately, I added the white beans at the end. The white beans really just have to get warm, but they also need to get mixed up with the rest to make sure they get nicely coated with all those other delicious flavors.


Even though this wasn't exactly the meal I had in mind when I started out, it was a fantastic dinner! The sausages take time to cook, but it is an easy meal to throw together -- and you don't have to pay attention to the sausages while they're steaming, so you are free to go off and do something else! The Indian flavors really came through nicely in the sausages and the kale, putting a new spin on an old classic. Definitely a meal we'll be having again!

Friday, August 27, 2010

Zucchini Bread Contest

Our CSA holds an annual zucchini bread (well, summer squash baked good) contest -- but I've always been afraid to enter. People always have preconceived notions about vegan baked goods, and I didn't really feel like dealing with it. But! This year, I put on my big girl pants and entered. I submitted two things -- chocolate summer squash bread and lemon zucchini muffins. Unfortunately, I forgot to take pictures. (Sorry!) Well, the results are in . . . and those lemon zucchini muffins were apparently a hit!

Here's what I won! A container of fresh raspberries and blackberries, and a tote bag with the name of our CSA on it. The berries were super delicious. Hooray for lemon zucchini muffins!

Saturday, August 21, 2010

Falafel and Cucumber-Tomato Salad

Last night, I made a cucumber-tomato salad and some falafel for dinner. We had a bunch of cucumbers and more tomatoes than you could shake a stick at -- so what better way to use some of those veggies up? And who doesn't love falafel?


For the cucumber-tomato salad, I used a bunch of CSA veggies: three small cucumbers (probably about two average sized cucumbers), one and a half giant tomatoes, and two small onions. The onions were chopped up and lightly cooked with some garlic before mixing with the other chopped veggies, for the same reasons as the last time I made a cucumber salad.

Since there was more of a middle eastern vibe to this meal, I wanted a hint of mint in the salad -- but I had no fresh mint. Instead, I made a small cup of mint tea and used that as the liquid when I cooked up the onions and garlic, letting it completely cook in. The veggies were tossed with a bit of lemon juice, a bit of lime juice, and a bit of olive oil -- then they just sat together in the refrigerator, letting their flavors mingle until it was ready to be served!

Falafel is another one of those quick and easy meals. I baked them this time, since we were bringing dinner over to the home of our friends who are moving out -- and their entire apartment is in boxes. Much easier to throw a tray in the oven than make a mess with the stove! Ahead of time, I mixed two cans of chick peas with few splashes of lemon juice and a variety of spices -- some cayenne pepper, onion powder, garlic powder, turmeric, and salt; this mixture was mashed all together with a fork, then I added a bit of chickpea flour to help bind the falafel balls together.

I made fourteen moderately-sized falafel balls in total, brushing them with a bit of olive oil on both sides before putting them in the oven. I had never baked falafel before, so I cooked them for the first 10 minutes on 350 before realizing the oven needed to be much hotter if I wanted the falafel to get crispy; the last 25 minutes were cooked at 400. Halfway through the baking time, I flipped the falafel over and made sure they still had a bit of oil brushed over them to keep from drying out.

They were delicious! The whole meal is easy to make -- and you can make it all ahead, heating up the falafel when you're ready to eat. The warm falafel coupled with the cold salad is a really great contrast, and the spices of the falafel are balanced nicely by the crisp coolness of the vegetables in the salad. Definitely a great meal for a summer night!

Wednesday, August 18, 2010

Vegan Omelette with Jalapenos, Potatoes, & Pepper Jack 'Cheese'

I am closing in on the perfect vegan omelette. I swear. I'm not quite there yet, but it is slow and steady progress from the last attempt at a vegan omelette. Last time, the outcome was a little too fluffy; this time, not quite fluffy enough. The taste is there -- the kala namak and chickpea flour combination are definitely where it's at! --, but the texture needs to be just right.

It's getting close though; so close I can almost taste it! I am definitely going to make another attempt this week, so hopefully I'll have an actual factual recipe to post soon instead of being a tease with only pictures.


Pretty though, isn't it? It's stuffed with home fried potatoes, a red jalepeno, a green jalepeno, and pepper jack style almond cheese. The home fries were cooked with garlic powder, onion powder, cayenne pepper, and a little sea salt; the cayenne pepper gave them a nice little kick! The red jalepeno was nice and sweet, with just a hint of spice to it; the green jalepeno lacked that sweetness but was a bit hotter than the red, giving a different layer of heat to the overall flavor. Finally, the almond cheese bound all of the filling together and gave the oozy cheesiness that I look for in an omelette. Totally delicious.


(Full disclosure: I probably wouldn't have posted another recipeless post about the vegan omelette, but I am compensating for the fact that I forgot to take a picture of a meal I wanted to post earlier this week! The missing meal was a lime basil pesto -- yummy pesto goodness with a hint of citrus! -- over rotini. If we get more basil at the CSA this week, I will try again! Pinky swear!)

Tuesday, August 10, 2010

Mexican Cucumber Salad

A couple of days ago, I made a big batch of black beans to use in various recipes; once the beans are cooked instead of dry, they need to get eaten -- so I was looking for a way to use the beans with some of the vegetables from this week's share. We had a nice cucumber, so I decided to make a cucumber salad with a Mexican-style twist.


Neither P nor I are fans of the bite that raw onions have, so I cooked the onions a bit with the beans to mellow their flavor a little. Other than that, this meal was basically of the chop'n'toss variety; chop up the ingredients and throw them all together in a bowl. Extremely easy, though it does take a little bit of time, since I wanted to let all the flavors mingle together in the refrigerator for awhile before serving.

It was the perfect meal for a hot night: cool and fresh, with a delightful tang from the lime juice. P ate his with a few warmed corn tortillas, but I ate mine just as is. It would surely be delicious with the addition of a diced avocado -- or a few dashes of hot sauce, if you're into that!

Mexican Cucumber Salad
  • 2 cups black beans
  • 1 onion, diced
  • 1 cucumber, diced
  • 2-3 small tomatoes, diced
  • 1-2 hot peppers, minced
  • 4 tbsp lime juice (or the juice of two limes)
  • 2 tbsp olive oil
  • 2 tbsp fresh cilantro
  • 2 tsp cumin
  • 2 tsp chili powder
  • 1 tsp garlic powder
  • salt and pepper, to taste
Optionally, you can first cook up the onions with a bit of water to mellow their flavor; I cooked them with the beans, because the beans needed to cook a tad longer -- and then let the whole thing cool in the refrigerator while I chopped the rest of the vegetables.

In either case, combine lime juice through salt and pepper in a bowl and mix well; add the vegetables and beans to the mixture and stir to evenly distribute the liquid. Refrigerate about half an hour, to allow the juices to mingle. More juice should form as the salad sits, so be sure to mix the entire salad again before serving.

Wednesday, July 28, 2010

Curried Chick Peas, Chard, & Potatoes

One of our family favorites -- you know, the standard meals that we have a million times a year, the one you whip up quickly when you have no time to cook -- is curried chick peas and green peas. Sometimes I throw potatoes in there too, or chik'n pieces . . . however the mood strikes that particular night. Well, we didn't have any peas in our CSA this week, but we did have a bunch of delicious-looking chard -- and some potatoes from the farmers' market. The chard looked super fresh and awesome, and was just begging to be devoured -- so I decided to mix up the ol'favorite with some chard.


The potatoes get diced and cooked first, in a little olive oil and a good-sized amount of curry paste. While P and I use a fairly hot curry paste, you can use whatever level of spice fits your personal taste. After sauteeing a little bit so the outsides of the potatoes are heading down the road into crispy territory (and are well-covered in curry paste), I put the lid on the pan to steam the potatoes for a bit so they can get nice and soft. While the potatoes are cooking, I wash and chop the chard, then open a can of chick peas. The chick peas -- and any stem bits of chard -- get added to the potatoes first, stirred up so they get their own nice thin coating of curry paste. Finally, the leafy chard gets added last, since it doesn't need to cook very long before serving. The whole meal comes together quickly, and is one of my favorites!

Saturday, July 24, 2010

Kalesanga

Tonight I made a giant tray of kale lasagna -- which I affectionally refer to as kalesagna. Since I made it with rice noodles, the whole thing was also gluten-free . . . though we ruined the effect by having slices of farmers' market whole wheat bread on the side.

I made my first kalesagna right after Aunt Karen died, to bring up with us when we went to be with the family; it felt Karen-y to me when I made it -- so it seemed particularly appropriate to make a kalesagna as part of my season of Karen.


The lasagna is made up of layers of tomato sauce, sauteed kale, and tofu ricotta; I had a bag of Daiya mozzarella cheese still hanging out in our fridge from before, so I used that for the top of the kalesagna.

The tofu ricotta I always make is based on the ppk's recipe, though I have made it so often now that I never look at the recipe or measure anything; in fact, when I just now looked up the recipe, I was a bit surprised to see it called for salt. My variant is a bit different from that recipe, but it is essentially the same thing. I've seen lots of vegan ricotta recipes out there, but this one is definitely the best. Even if I don't exactly follow it anymore, it's still definitely the best starting point for making your own ricotta. Plus the recipe is super simple, and throws together quickly -- always a bonus.

Wednesday, July 21, 2010

July in a Nutshell

Life has gotten busy, hence I haven't posted anything in almost three weeks; I've still been following the plan, it's just that the time for documentation has gotten scarce.  My summer class started, plus we had some car-related adventures leaving us stranded in Massachusetts for a few days.  Fun!

While I didn't document everything over the past three weeks by any stretch of the imagination, I do have a few highlights here to share -- from those few times when I actually remembered to bust out a camera!

Pinto Bean Burgers
I made these pinto bean burgers for the fourth of July, and we grilled them up at our friends' house.  Sarah, the lady of the house, also made some killer potato salad -- also pictured on the plate!  Sarah & Will had slices of soy cheese at their house, as well as some tomato and lettuce from the farmers' market.  The burgers themselves were an improvement on the black bean burger I'd made previously; much sturdier for grilling while being a bit lazier of a recipe.
  • 2 15 oz. cans of refried pinto beans
  • 1/3 c. whole wheat flour
  • 2/3 c. vital wheat gluten
  • 1/3 c. cornmeal
  • 1/3 c. salsa
  • 2 tsp cumin
  • 2 tsp cayenne pepper (optional, to taste)
  • 1 tsp garlic powder
  • 1 tsp salt
Combine all ingredients in a bowl until well mixed; if the mixture is too liquidy, add more flour or cornmeal as needed.  Divide into eight balls on a plate and refrigerate for at least an hour.
After cooling, flatten the balls into patties and grill at least five minutes per side until well-cooked.  Extra burgers can be placed between wax paper, wrapped together, and frozen until needed.

Vegetable and Gardein Kebabs
Again, at Sarah and Will's house, we made our first ever kebabs.  Although we all like kebabs, none of us had ever made them ourselves.  The peppers and tomatoes were from the farmers' market and the onions were from our CSA; the fake meat is gardein.

Sarah had bought wooden skewers to make s'mores, but she had plenty of extra skewers for the kebabs!  This picture is pre-grilling, though the kebabs looked a bit different after cooking.  Everything was supertasty, but the most notable thing for me was how deliciously sweet the onions were.  I was ambivalent about grilled onions prior to our kebab experience, but now I am a devoted fan of the grilled onion.  Mmm.

Swiss Chard Quiche

The swiss chard quiche was so good in principle, and such a disaster in practice.  The crust puffed up in all the wrong places, the chard was not soft enough . . . basically, this was a lesson in what not to do for quiche!  I used the crust recipe from Vegan Brunch and the tofu filling recipe from the Ultimate Uncheese Cookbook.  The idea of the quiche was a good one though, and I'm not giving up on it!  I will defeat the quiche by the end of this summer, mark my words.
We have stopped getting greens from the CSA though, so I'll have to figure out another vegetable that is good to quicheify.  More on the quiche saga as it unfolds!


The last two photos are not actually foods I prepared -- though they are foods I enjoyed!


This is my friend Sarah's famous blueberry pie.  It is as good as it looks . . . and maybe even better.  She makes it every fourth of July, with fresh blueberries from the farmers' market.  Did I mention that it is super good?  I'm not normally a huge fan of blueberry pie, but I absolutely make an exception for this deliciousness.  In fact, even the picture is making me crave it.  I don't remember her exact recipe, but I know it involves blueberries and lemon juice and no sugar.  And some kind of magic.  Yum.


Moroccan Sweet Potato Stew
Our friend Jimmy made this and brought it over to our house in early July.  His mother cut the recipe out of a magazine for him -- and we both thought it sounded fabulous.  Being the wonderful guy that he is, Jimmy whipped up a batch and brought it over to share with me and P.  It was super delightful, and we ate it over plain couscous.  Here's the recipe!
  • 2 tsp olive oil
  • 1 medium yellow onion, chopped
  • 3 cloves garlic, crushed with press
  • 1 1/2 tsp curry powder
  • 1 1/2 tsp ground cumin
  • 1/4 tsp ground allspice
  • 1 14.5 oz can diced tomatoes
  • 1 3/4 c. vegetable broth
  • 1 c chick peas
  • 1 large (about 16 oz) sweet potato, peeled and cut into 3/4-inch chunks
  • 2 small (about 6 oz each) zucchini, cut into 3/4-inch chunks
  • 1 c whole-grain couscous
  • 1/4 c loosely packed fresh mint leaves, chopped
In a nonstick 12-inch skillet, heat oil over medium heat.  Add onion and cook 8 to 10 minutes or until tender and lightly browned, stirring occasionally.  Stir in garlic, curry powder, cumin, and allspice; cook 30 seconds.

Add tomatoes, broth, chick peas, and sweet potato; cover and heat to boiling over medium-high heat.  Reduce heat to medium; cover and cook 10 minutes.  Stir in zucchini and cook, covered, 10 minutes or until vegetables are tender.

Meanwhile, prepare couscous according to package directions.  Stir mint into stew.  Serve stew over couscous.

Thursday, July 1, 2010

Rice Noodles with Tofu and Broccoli in Peanut Sauce

I had entirely forgotten about the two small heads of broccoli that we got this week from the CSA, until P reminded me on the way home from class. Broccoli is my very favorite vegetable, so I was super excited about all the dinner prospects before me. I decided that I wanted something relatively quick and easy, since I was tired from teaching for four hours. But I also wanted something tasty that would use up our sweet, sweet broccoli.

Ultimately, I decided to make the first meal I ever made for P, back when we first started dating. It's also one of my favorite meals, though I don't make it all that often for some reason. On top of all that, rice noodles cook super quick -- so it would all assemble pretty quickly.

After pressing the tofu, it was cubed and fried in peanut oil until the sides were a nice crispy golden brown. The broccoli got thrown in with the tofu once it had browned, then everything was tossed with the cooked rice noodles and the peanut sauce. Quick, easy, tasty!

Tuesday, June 29, 2010

Zucchini Cakes

Earlier this week, I saw a recipe online for "crab" cakes made from zucchini rather than . . . y'know, crab. The recipe was vegetarian, but not vegan -- and I was lacking a couple of the key ingredients (like Old Bay seasoning). So I winged it a bit.

The results were delicious. Looking at the picture now, I am making myself hungry again. I can see why the recipe called them crab cakes, even though the taste isn't the same; the texture is very crab cake-like. I had already shredded the zucchini and summer squash the same night I made the Chocolate Summer Squash Bread, so there was hardly any prep work involved; the cakes made a fast and tasty meal before I went off to teach class.

After class, we picked up some Old Bay seasoning at the store; I'm going to definitely make these again once we get another batch of squash (which will undoubtedly be this week). I will try them with the Old Bay and then post a definitive recipe here. For now, the picture is all I have to offer.

(Update: finished recipe for vegan crab cakes now available!)

Monday, June 28, 2010

Vanilla and Agave Nectar Cake with Orange Glaze

Any birthday celebration needs a birthday cake, so I decided to make Vanilla and Agave Nectar Cake from Vegan Cupcakes Take Over the World . . . except as a cake instead of as cupcakes. To convert from cupcake recipes to cake, just add about 10 to 15 minutes of extra time. The recipe says to bake for 20-22 minutes; the cake came out at 35 minutes perfectly cooked.

The only snag with the cake was that my dad was out of normal flour and I used what he had -- pastry flour. It wasn't until the cake was finished and I tasted it that I realized there was even more to it than that; it was whole wheat pastry flour. Whole wheat pastry flour is fine for many baked goods, but the agave nectar cake has a very subtle flavor that was overpowered by the whole wheat taste. If I'd realized, I would have added cocoa powder and made a chocolate-y cake that could stand up to the taste of the flour.

The orange glaze that covered the cake was made simply from cornstarch and pure orange juice. I whisked together the cornstarch and orange juice, then brought it to a boil -- still whisking. Once it reached a boil, I turned off the heat and whisked a bit more. It had a nice consistency, very glaze-like. And no need for any added sugar, since oranges are plenty sweet on their own!

All in all, this sugar-free cake was dandy; moist, sweet-but-not-too-sweet, and flavorful. The only thing I'd change next time is the flour -- or I'd add another flavor to compensate for the flour.

Sunday, June 27, 2010

Black Bean Burgers

My brother's friend arrived from England today -- and is staying at my dad's for the next month or so; in part to recognize her arrival and in part to celebrate my brother's birthday, we grilled at my dad's house for dinner. I made black bean burgers, which my dad threw on the grill along with some corn on the cob.

The black bean burgers were tasty and super easy to make, but a little on the squishy side for grilling; next time, I will probably modify the recipe a bit to make them sturdier and a little more grill-friendly. They stood up fine to the grill as is, even if they got a bit misshapen in the process.


I had mine with red chile, soy pepper jack, lettuce, and tomato on an onion roll. I made a double batch, so there are still a whole bunch of burgers in my dad's freezer waiting for our next barbecue!

Friday, June 25, 2010

Chocolate Summer Squash Bread

With the exception of the pancakes we had last weekend, I haven't made any breakfasty foods so far. And I really like breakfast, so that needed to change. Last night, I made two loaves of chocolate summer squash bread -- one to leave with my dad and brother and one to bring home for me and P.

The idea for the bread came from here, but I made a fair number of changes to it. I would have made slightly different changes in my own kitchen, but I was at my dad's house so I had to work with what he had. My modifications left out the eggs, oil, and sugar -- and added a tsp of baking powder and a mashed up banana. I also used a 10 oz bag of grain-sweetened chocolate chips in place of all of the chocolate in the recipe. I was at first planning to use the same quantity of chocolate as the original called for, but that left only a few chips in the bag . . . so I tossed the rest in. I originally bought the grain-sweetened chocolate for a recipe I planned to make for Karen's memorial, from a macrobiotic dessert cookbook called Love, Eric. I ended up making my own recipe of ice cream instead, which meant I had this chocolate around to use up! I also added an extra cup of flour at the end, because the batter looked much too liquidy -- I'm not sure if I would do that again in the future, but the squash I used was very juicy.

We had slices of the chocolate bread for breakfast this morning -- actually, a few pieces disappeared even before this picture was taken! The bread was dense and fudgey; maybe without the extra flour it would've been a bit lighter. The density wasn't a bad thing though! The bread was sweet but not too sweet -- perfect for breakfast -- and definitely very chocolatey.

I will absolutely plan to make this bread again with more of the summer squash we get; the modifications will be a bit different at home though, since I won't have bananas but will have access to other potential egg substitutes.

Beet Greens and Soyrizo with Polenta and Black Beans


Today was Thursday, which means that it was time for another CSA pick-up. This week, our bounty contained kale, beets, chard, carrots, more different beets, lime basil, broccoli, and five different summer squashes.

Thursday and CSA pick-up day also meant that we headed north to my dad's house, so that we could divide up our share and have a lovely dinner together.

For tonight's meal, I sauteed up all of the beet greens with soyrizo. P fried up some thin slices of polenta so that they got a little crispy, and we topped them with refried black beans and New Mexican red chile. It was a fast and simple meal, as my brother and dad both got home pretty late -- but definitely tasty.

Thursday, June 24, 2010

Asian Seitan Salad and Scallion Pancakes

Today Zelda had a playdate with her friend who is three weeks older than her -- so we brought over some lunch to share with the other parents. The last vegetables from our share for the week were a head of lettuce and the green part of the spring onions. I decided to make a salad topped with seitan made with Asian spices and a similarly-themed dressing -- plus scallion pancakes on the side.

The scallion pancakes were mostly the same as last time, but with a bit of whole wheat flour used in place of some of the all-purpose flour. I also had more spring onions, so I doubled the recipe to make two big scallion pancakes instead of one.

For the seitan, I used the seitan o'greatness recipe with modified spices. Instead of the listed spices, I used ginger, garlic, Chinese five-spice, and red pepper flakes; in place of Worcestershire sauce I used an additional two tablespoons of tamari. In retrospect, the tomato paste should also have been replaced. The tomato-y flavor that came through in the finished product detracted from the seitan's Asian feel. Still, the seitan turned out deliciously.

The dressing was also sauce for dipping the scallion pancakes, and was made of peanut oil, red wine vinegar, tamari, garlic, ginger, salt, and tonkatsu sauce.

Although there is no sauce in the picture, I did drizzle dressing over the salad -- and deposited a spoonful or two on the plate for dipping my scallion pancakes in. My neglecting to take a picture with the sauce can be chalked up to the two tiny humans and the World Cup game that were serving as serious distractions.

Kalezone

We got back from Massachusetts late last night, so tonight was the first meal I've actually made in a few days. I had been thinking of this as a "kalezone" . . . a calzone filled with kale, that is; but it turned out that I had less kale left than I thought, so it was filled with kale and beet greens.

They were awesome. The recipe made six calzones; I ate one and P ate two, so we have another meal's worth in the freezer for another night. The dough for the calzones -- given below -- came from the recipe in the Ultimate Uncheese Cookbook. I was not sure if using all whole wheat flour would make the dough be too dense, but it turned out perfectly.

The filling was made of tofu ricotta and sauteed kale and beet greens. The greens were sauteed in a little olive oil with the remaining spring onion bulbs; the tofu ricotta was based on a recipe from Vegan with a Vengeance and Veganomicon -- found here. That recipe is the basis for the tofu ricotta I use with great regularity; I use it so often that I hardly ever come near the original recipe anymore . . . but that is the source and the inspiration. The tofu ricotta and the greens were mixed together to form the filling, and the finished calzones were served with a side of tomato sauce.


Calzone Dough
  • 1 1/2 tsp active dry yeast
  • 1 c warm water
  • 1/2 tsp sweetener of your choice
  • 3/4 tsp salt
  • 2 - 3 cups whole wheat flour, more or less as needed
Place yeast in a large bowl and pour the warm water over it. Let rest 5 minutes. Add sweetener and salt, then beat in enough flour to make a soft but kneadable dough. Knead 5 minutes until smooth and elastic. Lightly oil a large bowl and place dough in it; turn dough over so it is lightly oiled on all sides. Cover bowl with a clean, damp kitchen towel and let dough rise in a warm place for 1 hour.

Preheat oven to 400° F. Line a baking sheet with parchment paper (or oil it, or mist with nonstick spray). Punch down dough and divide into 6 equal balls. Keep dough covered with the same towel and work with 1 ball of dough at a time. Place the ball on a lightly floured surface and roll into a 6-inch round. Place a heaping 1/2 cup of filling on one half of the round. Fold the empty side of the dough to enclose the filling. Seal the edges of the calzone by crimping them with your fingers or with the tines of a fork. Prick the calzones in a few places on top with the tines of the fork. Place them on the baking sheet as soon as they are formed. Mist tops lightly with olive oil (or cooking spray). Bake until golden brown, about 20 to 25 minutes.

Sunday, June 20, 2010

Turnip Soup, Take Two

Emboldened by the rousing success of the Indian turnip & chickpea soup, I decided last night to try a turnip soup without the help of Indian spices. Unfortunately, I really didn't have enough turnips to pull anything off; P remarked that he'd never heard anyone say "I don't have enough turnips" before, and he doubted he would hear it again. But that didn't stop me from trying! I left out the carrots, the chickpeas, and the curry powder from the other version -- and added a few cloves of garlic and some black pepper instead.

We sliced up some delicious bread from the farmers' market to eat with our soup, and set to eating.


It was a far cry from the deliciousness of the last soup. I thought it was . . . fine. Edible, anyway. But not good. P didn't even think that highly of it. He said it was like someone made hot cocoa, only instead of chocolate, they used turnips.

I ate my bowl anyway, but P was not about to eat his. And I was not about to let the soup be a waste. His main complaints were that it was too thin . . . and that it tasted like turnips. So I doctored up the soup: thickening it up with some cornstarch, then adding a can of chickpeas and some curry powder that my friend Charlotte sent me.

As you can see, the soup looked a lot different after that. Yellower, lumpier, thicker. Also, spicier and tastier.


So I guess the lesson was learned: if I'm going to make turnip soup, it had better not be just turnips.

Saturday, June 19, 2010

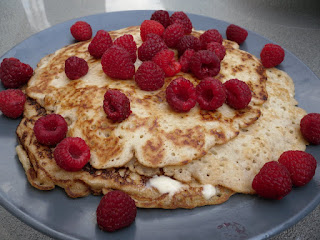
Pancakes with Raspberries

Yesterday, we got two containers of raspberries from the farmers' market in town -- the first of the summer. This morning, all I could think about were the raspberries . . . so I decided to make pancakes to go with them; really, the title of this post should be "Raspberries with Pancakes."

I made Isa Chandra Moskowitz's pancake recipe, available in Vegan with a Vengeance or Vegan Brunch. They were delicious and perfect, especially once they were covered with raspberries!

Vegan Chorizo with Greens

For lunch today, I had my first ever reuben, courtesy of my bff Sarah. She made Vegan Dad's corned beef, we made vegan Thousand Island dressing, and bought some sauerkraut from the farmer's market. In general, I don't like salad dressing, I don't like swiss cheese, I don't like rye bread, and I don't like sauerkraut . . . but this sandwich was really, really good. P calls this the gin-and-tonic effect; gin and tonic are both pretty awful on their own . . . but magically, together, they form a delicious cocktail.

Anyway, I don't have a picture of this glorious masterpiece. It was exquisite looking, especially with the nice salad on the side made from lettuce, arugala, tomatoes, and scallions Sarah got from the farmers' market. Oh well. Instead, I have a picture of our rather unphotogenic dinner: vegan chorizo with kale and beet greens.

Just because something tastes good doesn't mean it looks pretty in a photo, as tonight's dinner will attest. I made a variant on the chorizo sausages from Vegan Brunch -- making them extra spicy! -- and sauteed the greens with two of the sausages. The greens and sausage mix were served over Spanish rice made with brown rice.


Something went wrong with the sausages while they were steaming, though, and they ended up much softer than they normally do. As a result, it was more the crumbly style of chorizo rather than the slicey kind. It still mixed up well with the greens though! P thought the sausages might've been a little too spicy; I liked them how they were, but I'll probably tone down the spice the next time I make them. There are still two more of these extra spicy, crumbly sausages to use up. I'll probably make some whole wheat pasta with kale and the other two sausages later this week!

Friday, June 18, 2010

Vegan Beet Halwa

With our Indian-themed dinner, we needed an appropriate Indian dessert. Conveniently, we had a bunch of small beets in the CSA share -- perfect for beet halwa! Halwa is typically made from a ton of ghee and milk . . . not exactly vegan; this version uses canola oil and s'milk instead. There's also usually sugar, but a bit of agave nectar works just fine.

Once all the beets were grated, it yielded about one and a half cups, but there's no reason you couldn't scale this recipe up or down.

Vegan Beet Halwa
  • 1 1/2 cups grated beets
  • 2 tbsp canola oil
  • 1 1/2 cups soy milk
  • 1 tbsp agave nectar
  • 3 cardamom pods
  • a handful of cashews

Fry the grated beets in the oil for about two minutes. Add the milk and simmer, stirring occasionally, until the beets seem cooked. Stir in the agave nectar and cardamom pods, then simmer until the liquid is gone, still stirring occasionally. Once the liquid is gone, remove from the heat and add the cashews (I crushed them into smaller pieces first). Serve warm or allow to cool.

Indian Turnip & Chickpea Soup

I have to start off with a confession: I am totally afraid of turnips. Or I was anyway -- until tonight's soup changed all that. It's not that I never had turnips before, it's that I never liked how they were prepared. So tonight I gave turnips one more chance -- but I was still skeptical.

To use up half of the turnips from this week's share, I decided to make an Indian-flavored soup featuring chickpeas and turnips; Indian food is my favorite, so I figured that if anything was going to salvage turnips . . . Indian spices would be it!

Still, just to be safe, I fried some tofu in an Indian sauce to make sure there would be something else to eat in case the soup turned out horribly wrong. It turns out my precautionary measure was totally unnecessary -- the soup was awesome.

All four of us -- me, P, my dad, my brother -- had seconds; some of us even had thirds. The tofu got eaten, but only as an afterthought. Let me say it again. The soup. Was. Awesome.

Granted, it isn't terribly photogenic . . . but I am willing to forgive it on that point. You can see a bit of the tofu peeking out from behind the bowl, as if trying to remind me that it was there. Sure, sure. I see you, tofu. But getting back to the soup . . .


Indian Turnip & Chickpea Soup
  • olive oil
  • 1 spring onion bulb, chopped (regular onion would be fine too)
  • about 2 cups of turnips, chopped into small chunks
  • 2 15-oz cans of chickpeas, drained
  • 2 small carrots, chopped
  • about 2 tbsp curry powder, to taste
  • a dash of salt
  • 4 cups vegetable broth
  • 1 1/2 cups plain soy milk
Drizzle a bit of olive oil in the bottom of a pot big enough to hold the soup, sautee the onion until brown. Add the turnips through the salt, stirring to make sure the spice is distributed well; add the vegetable broth. Bring to a boil, then allow the soup to simmer covered for at least 20 minutes until the turnips are soft and tender. Remove two cups of soup to be pureed in a food processor or blender, then return to the soup. Add the s'milk and mix everything back in. Gently warm up the soup to make sure it is heated throughout, then serve.

Thursday, June 17, 2010

CSA Booty

Thursday is veggie pick-up day! And not a moment too soon, since we used up the last of our vegetables in last night's dinner . . .

Thursdays are also normally the day we head up to my dad's house. We split our CSA share with my dad and brother, so it's the day where we divide up the veggies and I make dinner for the family. More on that later.

Here's what we got this week:
From left to right: kale, beets (with greens), carrots, spring onions, mustard greens, giant head of lettuce. In the front, big ol' pile of turnips and head of red lettuce.

Glorious, isn't it?

Scallion Pancake and Spicy Tofu with Mustard Greens

The only veggies left from this week's CSA share were mustard greens and three spring onions, so . . . that's what we used for dinner! Spring onions and scallions are very similar; the long green part tastes basically the same, but the spring onion has a much bulbier bulb at the bottom -- much more like an onion than the white part of a scallion. The long green part of the spring onion was used to make scallion pancakes, while I saved the onion-y bulbs for use with the mustard greens in the tofu stirfry.


When I'm cooking, I tend to just eyeball recipes -- not exactly helpful for sharing with others -- but I have a reasonable guess as to quantities. If nothing else, the relative amounts are true. In the future, I really should try measuring things out if I am going to be writing it down! For now, this is what I have.

Spicy Tofu with Mustard Greens
  • 1 pound of tofu
  • 6 tbsp peanut oil
  • 3 tbsp tamari
  • a splash of apple cider vinegar
  • a splash of lime juice
  • 2 tsp chinese five spice
  • 2 tbsp red pepper flakes
  • 1 bunch of mustard greens
  • 3 spring onion bulbs
After pressing the tofu for at least half an hour, combine the peanut oil through the red pepper flakes in a bowl and allow the tofu to soak up the sauce-y goodness. The red pepper flakes will make the tofu spicy, so feel free to use more or less as desired. I like to use the container the tofu comes in for mixing up marinades, since it is exactly the right size -- and it gives the plastic carton another use before it heads to recycle land.

While the tofu is soaking, chop up the greens and the onions. After allowing the tofu to marinade for at least twenty minutes on each side (flipping the tofu makes sure that the top and bottom both get coated well), slice it into chunks for pan frying (and if you slice the tofu while it is still soaking, it allows the marinade to seep into the tofu even more). The leftover marinade can go right in the pan, and begin by sauteeing the onions in the mixture. Add the tofu next, flipping it to make sure it gets brown and a little crispy on both sides. Add the mustard greens last, as they don't need too much time before they are well-cooked.


Scallion Pancake
  • 1 cup of flour
  • 1/2 cup hot water
  • 3 scallions or spring onions (excluding the bulbs), chopped
  • peanut oil (or olive oil)
  • salt
Put flour in a bowl, then slowly add the water in a steady stream. Continue to mix the flour and water while the water is being added, until it forms a ball of dough. Cover with a damp cloth and allow to sit for about thirty minutes.

Roll out the dough onto a floured surface, then brush with a small amount of oil. Cover the dough evenly with the scallions, then sprinkle a bit of salt over the entire thing. Carefully roll up the dough and scallions into a long cylinder. Once you have rolled it into a snake, tightly coil the roll like a cinnamon bun. This coil can now be rolled out into a fairly flat pancake. The pancake should be fried lightly on both sides, until each side is a golden brown; this takes about five minutes per side.

Wednesday, June 16, 2010

Vegan Omelette with Spinach and Green Chile


When I first became vegan, I concocted a vegan omelette recipe which -- while delicious -- was far too time-consuming to make on a regular basis; the omelette had to be first baked and then pan-fried. For breakfast today, I made my first attempt at a new and easier recipe.

While extremely tasty, the texture wasn't exactly right; it is still definitely a work-in-progress. I loved omelettes before my vegan transition, so I am very picky about their vegan variants. If it isn't exactly right, I'm not interested.

This omelette was stuffed with sauteed spinach from the CSA and, at P's suggestion, smothered with green chile. Mmmm.


My favorite vegan omelette can be found at The Lone Wolf in Amherst, MA. Theirs is a fluffy, delicate wonder made from rice flour and coconut milk. My version is primarily made of chickpea flour, but it has the same kind of fluffiness as the Lone Wolf's omelette. While the Lone Wolf omelette has a hint of sweetness, the omelette I made this morning was purely savory. Black salt (kala namak) is a key ingredient in my omelette . . . and in my tofu scrambles and all of my other vegan egg dishes. When you smell black salt, you instantly understand why that is; the salt has an extremely sulfurous smell, and it gives a distinctly eggy flavor to everything it touches.


(Update: vegan omelette, take two!)

Curried Lentils with Kale

Tonight, after the Celtics game, we wanted to eat something quick and easy for dinner. We had a huge bunch of kale from the CSA this week and still had a bit left, so I decided to use the rest of it with dinner. The quickest thing I could think of, after a consultation with the pantry, was to make a big pot of lentils to go with the kale. I'm partial to Indian food, so curried lentils and kale seemed like the best way to go.


The lentils were fantastic. I didn't measure out anything exactly, so the measurements in the recipe below are approximate. The kale was also delicious; it was sauteed with some olive oil and a few diced cloves of garlic -- nothing fancy. We still have a ton of lentils left, even after seconds, but it'll make a good snack later this week!


Curried Lentils
  • 2 cups of lentils
  • 8 cups of water
  • 2-3 tsp turmeric
  • 2-3 tsp coriander
  • 2-3 tsp curry powder
  • 2-3 tsp cayenne pepper
  • 2-3 tsp ginger
  • salt to taste
After rinsing the lentils, simmer for approximately 20 minutes until most of the water has been absorbed. Stir in the spices and simmer for another 5 or so minutes. The lentils should be soft enough that they stick together a bit and scoop easily. The cayenne pepper makes the lentils spicy, but could be safely left out if you don't want the heat.

Tuesday, June 15, 2010

Taco Salad

P is a big fan of Mexican food, so it makes a regular occurrence in our meals. One of our standard staple meals involves beans, veggie meat, and salsa; store-bought veggie meat isn't on the list of foods, but wasting food isn't very environmentally friendly either. We had one package of Lightlife's chik'n strips in our refrigerator to use up, and this meal accomplished that! In the future, I'll make seitan or some other homemade veggie protein -- or just use beans alone.

Tonight, we had the standard Mexican blend over arugula and a mixture of lettuces from our CSA -- forming delicious taco salads! (In the background, you can see the jar of delightful iced hibiscus tea that accompanied my dinner.)


We filled deep bowls with lettuce, then spooned the bean-n-chik'n mix over it, and topped with a bit of salsa. The mixture is so easy to make there's not even a need to write it out like a full recipe. Just drizzle a little olive oil in a pan and saute a few cloves of diced garlic, then add the veggie meat. Once the veggie meat has had a little time to get brown, add about two cups of black beans and cover with just enough salsa (we used green chile) to keep it all moist while cooking. If you add too much salsa, don't worry -- it'll get soaked up by the veggie meat and beans while it cooks.


There are infinite variations on this very simple meal; perhaps this is one of the reasons why we have it -- in one of its many instantiations! -- at least once a week.

Blueberry & Cherry Ice Creams

This season of Karen-inspired eating really begins with the dessert I made for her memorial service: cherry and blueberry ice creams. The day before the service, we stopped at the farmers' market at the Rutgers Gardens in search of fruit. The only fruits available at any of the stands were cherries and blueberries, so we bought two containers of each. Each container held about one pint of fruit, so I had four pints total to work with . . . minus the few cherries and blueberries that were sacrificed to me and P. We just, y'know, had to make sure they would pass muster. And they did!

Once at home, I decided I would make one batch of blueberry ice cream and one batch of cherry ice cream. Each batch made 3 quarts of ice cream, so there was plenty to bring with us the next day!

Blueberry ice cream on top, barely visible cherry ice cream on the bottom.


Blueberry Ice Cream
  • 2 pints blueberries
  • 1/3 cup lemon juice
  • 5 cups non-dairy milk
  • 4 tbsp tapioca starch
  • 2 tsp vanilla extract
  • stevia to taste (optional)

Cook the blueberries, lemon juice, and stevia (if using -- I didn't use any!) over low-heat in a saucepot until the berries start bursting and creating juiciness. Add four cups of the non-dairy milk (I used coconut milk creamer). Bring to a boil and then remove from heat.

While the mixture is boiling, whisk the tapioca starch with the remaining cup of non-dairy milk (I used plain soy milk for the last cup) until it is well-dissolved. When the mixture is removed from the heat, whisk in the tapioca-and-s'milk slurry. Mix in the vanilla, then set aside to chill. Freeze according to ice cream machine's instructions.


Blueberry closeup.


Cherry Ice Cream
  • 2 pints cherries, pitted and chopped
  • 5 cups non-dairy milk
  • 4 tbsp tapioca starch
  • 2 tsp vanilla extract
  • 1 tsp almond extract (optional)
  • stevia to taste (optional)

Once the cherries are chopped, cook with stevia (if using -- I used about 1 tsp) over low-heat in a saucepot until they get juicy. Add four cups of the non-dairy milk (I used coconut milk creamer). Bring to a boil and then remove from heat.

While the milk and cherries are boiling, whisk the tapioca starch with the remaining cup of non-dairy milk (I used plain soy milk for the last cup) until it is well-dissolved. When the mixture is removed from the heat, whisk in the tapioca-and-s'milk slurry. Mix in the extracts, then set aside to chill. Freeze according to ice cream machine's instructions.